Building a NAS

It’s time to separate building a NAS from the building a PC topic. A moderator can move the relevant messages to here is they want. I’ll recap just in case.

First, why do it yourself if you can buy one?

  • To learn how.
  • It can be less expensive if you already have some of the components or find them at a recycler. Example: I wanted a spare case as a test bench and found a Cooler Master case with five 3.5" bays and five 5.25" bays for $20 and came with a DVD drive and a PSU. This was after I already bought the case I wanted for my NAS. If it wasn’t so massive, I’d be tempted to move everything into there.
  • Not locked into a proprietary system such as QNAP, where if it fails, you have to buy another because of the way the drives are handled.
  • You can decide between a small case that requires a more expensive tiny-sized motherboard and PSU and is limited on number of drives you can fit in there versus a larger case that will hold the number of drives you want and accepts less-expensive motherboards of common sizes.
  • A quick look on Amazon shows that the cost of a pre-built NAS without discs jumps a lot as you add each additional drive bay. Example: 2-bay NAS ≈ $220, 4-bay NAS ≈ $360, 8-bay NAS ≈ $1000.
    As a rough guide, maybe a four drive system is the cut-off point between buying pre-built and homebrew?

Why wouldn’t you do it?

  • Convenience. Someone else already did the work to make it.
  • Plenty of well-known companies to get them from, such as Synology, QNAP and Asustore.
  • Homebrew could wind up being more expensive when you tally up what you spent on the hardware, excluding drives.

Hard drive selection:

  • Hard drives are a separate cost. Pre-built units will be labeled “diskless” if they don’t include drives.
  • At present, mechanical hard drives have a good price per terabyte ratio. SSD isn’t there yet but is closing the gap. It’s a toss-up right now whether NVMe will be a better alternative to SSDs in the future.
  • Get NAS-rated drives. This could be your primary lifeboat for your data. Longer warranty, spins slower so they run cooler, designed for the job.
  • Do not use drives made with Shingled Magnetic Recording. The extra capacity isn’t worth the performance drop due to the continual song-and-dance the drive has to go through to update recorded data.
    ●● With Western Digital drives, this means making sure you buy their “Red Plus” or “Red Pro” line instead of “Red”. Other brands are more straightforward in their brand names.
  • You might be able to get a NAS-rated drive inside an external hard drive unit like a WD MyBook for cheaper than buying the bare-bones drive itself. I couldn’t find a way of determining the type of drive WD puts in them, so I bought bare-bones drives. The good news is they arrived in one box instead of multiple shipments.
1 Like

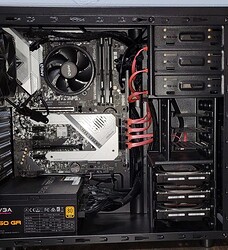
You know by now I wanted to build my own. Here’s the new shiny. It’s the first one where I tried to do serious cable management and it looks pretty clean.

The motherboard has 8 SATA ports. This picture is from before I added two SSDs and turned the RGB lighting on with a simple always-on red color to complement the SATA cables. I’ll rarely see it because the covers don’t have a window. I’ll get to the SSDs in a moment.

The case is a Thermaltake Versa H21. It uses plastic trays for the drives. If you get creative, you could mount three or four 3.5" drives in the 2.5" bay area if you do so vertically with some custom brackets or even just Velcro straps and protective spacers for the PCB side of the drives. If I wanted to, I could have also got an adapter bracket that would fit four or five 3.5" drives in the 5.25" bay area.

It would probably take a bit of creative tinkering and a 3D printer to make some custom brackets, but the bay at the bottom has room to fit five 3.5" drives. Theoretically, this could hold 14 drives.

You’ll notice there’s no graphics card or sound card in it. A NAS doesn’t need them, but if you install a Plex media server on it, you might need a graphics card for some video processing benefits. I’m undecided on this. The onboard audio/visual is enough right now, but if I need more later, I can plop in a GPU.


The OS is TrueNAS Core. Free, reliable, uses OpenZFS to self-heal bit rot on the drives, pretty easy to set up. Once it’s installed, the mouse, keyboard and monitor can be disconnected because you’ll use the web interface. The six 8TB drives in mine are set up with a single pool in a striped array, so I get about 31TB of storage space. I thought it was going to be closer to 40TB because you effectively lose one drive in the striping process, but they’re showing up as 7.28 TB drives. I guess there’s more usage from the OS.

The initial backup to it is being done with little more than a simple file copy or RichCopy. I’ll have to set up an automated backup afterward that can look for changes. It’s going faster after I remembered I was still using Cat5 cables and swapped them for Cat6.


I also have a bunch of separate drives with programs recorded off of the TV back when I had my own PVR, plus hundreds of VHS tapes to digitize. I’ve been backing them up the hard way by plugging those drives into my Windows computer and transferring them across the network. The easier way is to plug the drive directly into the NAS and let it import the files itself. I can organize them later.

Another harder way I tried that hasn’t worked was I thought that maybe if I set up a virtual machine running Linux, I could plug the drive into the NAS and do the file copy through Linux. The reason why it hasn’t worked is twofold.

First, the Linux VM can’t see any attached physical drives. It only sees the filesystem that TrueNAS creates for it.

Second, I can create the VM and run a Linux session using the ISO uploaded during the VM creation, and I can install the OS from the ISO, but I can’t get the VM to switch over it after the install is done. I thought it was because it needed dedicated physical drives instead of a spot within the TrueNAS filesystem, and I added a pair of 240GB SSDs. Nope. It won’t do it. It just won’t boot into the Linux “partition” (in actuality, a separate drive pool inside TrueNAS).

There’s a possibility that this may be tied into a slight incompatibility between the FreeBSD TrueNAS runs on and Linux. I’m probably going to give up on that and take the SSDs back out. I already have a separate Linux computer. The Import command in TrueNAS will do what I needed this VM to do anyway.


So far, so good. I now have the better backup system I kept saying I needed but never got around to implementing.

1 Like

I was on NewEgg just this morning trying to put together components to do this exact thing. I have 6x 4TB drives that I want to put into a box to do exactly what you’ve done with TrueNAS. Mobo, RAM, processor would all cost me about $400. I’d need a case, but may be able to find one around here cheap. I have a power supply from a previous build, but it’s in storage right now and I need to get that to proceed. Maybe in a couple of months I can get this going. I can make plans until then.
My problem is that 4 of the drives are in a QNAP enclosure and I want to add 2 more. My solution is to copy all of the existing data to an 8TB external archival drive (which is enough right now), create the new 6 disk system, then copy it back over. It’ll take a while, but should work out. If I start the first copy now, it might be ready by the time I need to copy it back.

I have some troubleshooting to do. Importing from a drive still doesn’t work. TrueNAS keeps saying it doesn’t recognize the filesystem on the drives, even though they’re in plain jane NTFS format.

At least I’m learning that the drive speed really does make a difference. Some of these 7200 rpm drives are getting a bit warm to the touch. They’re the heavy, older drives like the 500GB drive from 2007, so they have some pretty thick platters.

I’m going have to do something with this. The used case turned out to be a Cooler Master HAF 922. Other than it being dirty inside from built-up dust and someone tried to remove the front cover without removing the screws first on one side, it’s in good shape. I mean, really. Bays for 10 drives and you can have three 200mm fans plus two more 120mm fans. This thing is roomy, but it is a big boy at almost 2 feet tall.

Regarding buying external hard drives because they can be cheaper than a bare bones drive, it’s probably not a good idea even if you can find one that specifies it has a NAS-quality drive inside it. I decided to take the cases off of a lot of my external drives so I can save on space. Some are not designed to be disassembled without almost resorting to using a Dremel. It’s a shame the SimpleTech Pininfarina cases have a USB 2.0 interface. They look pretty nice, otherwise.

You might also find that the “de-cased” external drives are a dead-end. I’ve heard that some of them have a USB connector on the drive’s logic board, rather than a SATA connector. (Sorry, no further info as to brand / make, etc.)

Another thing to factor in when you are choosing how many drives to put in the NAS. TrueNAS recommends you don’t go past 80% full so it has room to work on maintaining the file system and file integrity. Realistically, I’m only getting ~25TB of usable storage out of the potential 48TB of the six drives.

If I had known this, I would have bought two more 8TB drives to use all the SATA ports on the motherboard. Higher capacity drives would have been another answer. Right now, Amazon’s price for WD Red Plus drives has 4TB drives for $70. It’s an additional $40 per 2TB you go up. I would have added $250 onto this project if I chosen 10TB drives.

I’m seeing conflicting info about whether or not you can add more drives into an existing pool. Most say you can’t, a few say you can. Some that say you can are actually talking about creating a new pool with a separate group of drives.

Another message pointed out that the higher the number of drives in a pool, the lower the chances of a successful rebuild when a drive fails.

Something I’m considering is starting over, but in a roundabout way. I’ve reorganized the files on the NAS so making another copy from the individual drives would mean I’d lose what I’ve done so far. I think I found enough empty drives to make a temporary backup of what’s on the NAS. Then I can wipe the pool, add two more drives and split them into two pools of four drives, then start restoring from the temporary backup. If something borks, I just fall back to re-backing up from the original drives.

Once that’s complete, I’ll probably have enough parts to assemble another computer to hold the VHS transfers. I’m going to give the motherboard that had Windows 7 on it one more try in the spare case to see if it will work. If it does, great. It can be an offline editing station. If not, I’ll figure something else out.

1 Like

Got a new mobo and a Ryzen3 3100 chip. The board has 6 SATA ports. I added a PCI SATA card with 2 more SATA ports. That gives me 8.
I’m debating whether to add an M.2 NVME drive to the board or a small SATA SSD for the OS. The NVME steals the use of 2 of the onboard SATA ports. I’m only attaching 6 drives, so either way I’m covered. I don’t think it really matters that the NVME would be a touch faster.
I’m just waiting on the 16GB of RAM to be delivered and I should be able to get started.
If I only had that box of extra computer parts so I could put in the fans and power supply.
The 2 extra 4TB WD RED drives are in place. I heard that it is super difficult to add drives to an existing pool using TrueNAS, so I’m planning to have all 6 in place at the start.
It’ll all be stuffed into my old Lian Li PC-30 case. It’s perfect. There are 6x drive bays (bottom and middle) and another 2x 5.25" bays empty on top. I’ve had this case for 20 years. I think the only problem is that the power supply I have has the fan oriented to be against the side panel. I may have to get creative with my pillar drill.
image image

Okay, this was dumb. I don’t have enough spare hard drives to make a copy of the NAS to keep the file organization before breaking the pools and adding two more drives. The spares I do have are much smaller (2TB is a common size), so I’m almost at the point of using a spreadsheet to verify I’m copying all the bits and pieces without missing any.

I’m going to delete the files from the NAS that I know are still on their original drives to shrink down what I have to duplicate before breaking the pools.

Chalk this up to learning how to plan a backup system and adding more capacity than the supposedly over-generous amount you thought you needed. As pointed out before, the rule of thumb is you’ll have 50% of the potential hard drive space taken up by the file system, striping for data parity info and giving TrueNAS a 20% buffer to putter around in while it keeps everything hunky-dory.

1 Like

On the subject of planning a backup system, let’s talk drive cooling.

The case I bought had enough room for the six drives I planned to use. The two I just added are mounted vertically inside the 2.5" bay in the time-honored manner of “whatever gets the job done”. To wit, I used cardboard as a protective spacer between the drive cover and the frame to avoid scratching the cover and strapped 'em down with Velcro. The PCB side of both drives are facing inward.

I checked on it a day later, touched one of the drives and it felt a little warm. This is normal and less than it would be if I bought drives running at a higher speed. But it reminded me that the drives could use a little bit of cooling. The cardboard got trimmed down to just a frame instead of a solid piece so it’s a spacer instead of an insulator.

Thermaltake’s Versa H21 case doesn’t have any provision for mounting a fan in front of the lower drive bay but does have enough room to attach a 140mm fan with zip ties. 120 would even work. Off to the local stores to see if they have them. Otherwise, Amazon gets another sale.

Up top, I changed how the adapter brackets are attached to the drives to move them closer to the motherboard. I’m relying on one screw each with a washer and the support tabs to hold the bracket to the case. It should be fine. There’s room now for a fan, also zip-tied to the frame. (Edit: Had to use a 120mm fan for this area to fit within the opening. Front cover wouldn’t go on otherwise.)

There are products like EverCool’s dual 5.25" to three 3.5" bay adapter that have a fan. The way I look at it, by stacking the drives so close together, you’re making them dependent on the fan to keep cool. It’s an 80mm fan so when it fails, you’ll have to order it. The computer stores I’ve been in don’t stock fans smaller than 120mm.

That just leaves the two drives in the 2.5" bay. I’m going with the idea that the two fans nearby will provide enough airflow in the vicinity to provide indirect cooling. The only option for direct cooling is to move one to the outside of the bay to make room for a drive cooler on each of them. It would be a squeeze because right behind the new position is the pass-through area in the case where I routed power and SATA cables for the drives. I’m going with the indirect cooling. It should be more of a nicety and a precaution than a necessity with the NAS-rated drives running at the slower 5400 rpm speed.

If you’re going to ask why not just use the Cooler Master case for the NAS since it’s designed for higher airflow with a 200mm fan up front, it’s too big and the front access port assembly is snapped onto the top, making it an uneven surface.

A NAS should be something you can put where you need it and it doesn’t take up any more space than necessary. Under normal circumstances, you don’t have a keyboard, mouse or monitor attached to it, making it unobtrusive. The CM case is made for gaming and to show off. I have something else planned for it, anyway.

New issue with TrueNAS and Windows in combination. I did split the drives into two pools of 4 to help it cope better with drive failures not taking down the entire storage capacity.

There may be a way to assign a user to have access to more than one shared pool but I couldn’t find it. I got around it by creating a second account on TrueNAS and setting its home directory to the second share.

Windows would let me see the second share but I didn’t have permission to do anything in it. You get around that by changing how you connect to it. Instead of using \\server in File Explorer, you connect to the IP address. This makes it a separate connection and you can enter separate credentials to get in.

Something I’ll have to fix later on, but it’s working for now.

By the way, when typing in a network path example here in the forums, you either have to wrap it in the pre-formatted text tags, or you put in three backslashes to make two show up.

Edited to add another issue. Importing disks is finally working but it sets permissions on the folders and files so they can only be viewed. Rather than dink around with trying to find which chmod parameters will actually let me move and delete the imported files, I’ll just keep copying files across the network. Maybe there’s a simple answer. What I’ve tried hasn’t worked. I’m not immediately finding it, so taking longer to get files to the NAS is better right now because I can let it run while I do other things.

Do I really need ECC memory in my box?
Yes?
Crap.
Okay, I guess I need to shell out another $70 for memory.

This might be interesting. I didn’t even think about making sure I got ECC RAM. I bought what the store had available, which is non-ECC unbuffered. Maybe it being gaming-rated Patriot Viper memory will be good enough?

Might be specific to your motherboard?

I checked my mobo and it can accept ECC. I checked my proc and it can use ECC, but it isn’t officially supported. While ZFS works best in conjunction with ECC, I’m not going to bother and just hope for the best for now. I may change my mind.
I got that info from the Intro to ZFS video on YT.
Because there is no FSCK process, the system depends on hardware error checking for data integrity.
Okay, now that I re-read that … I’m getting ECC memory before I even turn this thing on.
I was on the cusp of software installation. I’ll put it off again until I get the new 16GB of ECC RAM.
“Hello, NewEgg …”

Lincoln Run

Any idea on how to LLF a SAS drive? I dont have a server i can use, or a raid card on my laptops that will work.
I have a SAS to USB-A and that about it.

Ive tried: mounting in Linux, mounting in mac os, and Windows 11,
GParted, disk management, partmagic, HDDLLF.

Everything I’m finding is saying:

  1. Low-level formatting hasn’t really been done for 20 years,
  2. you need a raid card/server with a raid card

Assuming you did a simple internet search of those terms.

Yes, this option > free.

I did try that tool, thats the HDDLLF. It doesn’t see anything aside from my boot drive.

Im now trying using a Dell Server, and the Sas drive box.

Im getting into screen called Per h830 adapter bios con fig util,

Its seeing some of the drives, but the 2 I was testing with are “failed” and Its not letting me make changes.

I don’t know if going via Bios is the right way to go, or if I should be going through an OS.

I’m pretty sure I’m out of my depth.

1 Like

Update, i have reset the dell r620 that i found and got clearance to use.

Once i format it, ill install WS2022, then try the tools again. Im thinking i can get the drivers, and updates for the Raid card and box.